Working with solids in 3ds Max is great. 3ds Max has improved a lot over the last few years when importing STP, IGS or other solids formats. When imported, you get Body Objects. Usually the work doesn’t end here. You need to convert the body object to a mesh. This tutorial deals with the dark arts of the mesh settings.
Solids versus Meshes
What’s the difference between solids and meshes anyway? You can compare a mesh to a raster image. A mesh can have a low or high resolution. When the mesh has high resolution it’s usually more accurate. A solid is more of a vector image. It uses mathematical curves to describe surfaces. Just as with a vector image, you can zoom into a solid without losing accuracy.
The issue is, when working in 3ds Max or other 3D packages you need meshes to do any meaningful work. 3D engines, such as game or webgl engines, only work with meshes.
Converting solids to meshes
When a solid is imported in 3ds Max you get a body object. The body object has 5 options to control how a mesh is created. This is great, because it offers great control to optimize your mesh in a clean way. It’s better than using ProOptimizer afterwards. But these options are pretty hard to understand, especially when combining them. The 3ds Max documentation describes them, but it doesn’t really help.
Take a look at this sequence to see how important picking the right settings is.
The settings
Face approx Angle
The maximum angle for each pair of polygon faces. Faces with an angle greater than this value between them are subdivided into multiple polygons. Decreasing this value increases the mesh resolution.
This setting works with angles to approximate curved surfaces. In general this means that both large objects and small objects get the same amount of detail. check out the example
 This torus has both a big curve and a small curve. You can see both curves get the same amount of segments. Let’s say that I want to decrease the number of segments for the small curve. I can increase the face approx angle.
I like the number of segments on the small curve. But the big curve now doesn’t have enough segments. The face approx angle setting can’t solve this.
Face distance percentage
The maximum allowable absolute error between the mesh and the actual precise (solid) geometry. The percentage is based on the size of the object. Adjusting this value is the preferable way to increase the mesh quality without getting too many polygons.
If we go back to the difference between a mesh and a solid, this setting is easy to understand and very useful. Draw a perfect sphere and then convert that sphere to a mesh with as little faces as possible. The condition is that the faces can’t be too far away from the perfect sphere surface. that distance is measured in % of the size of the object.
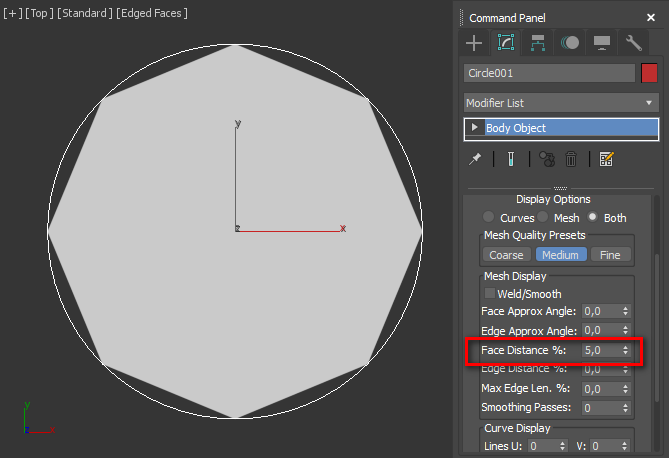
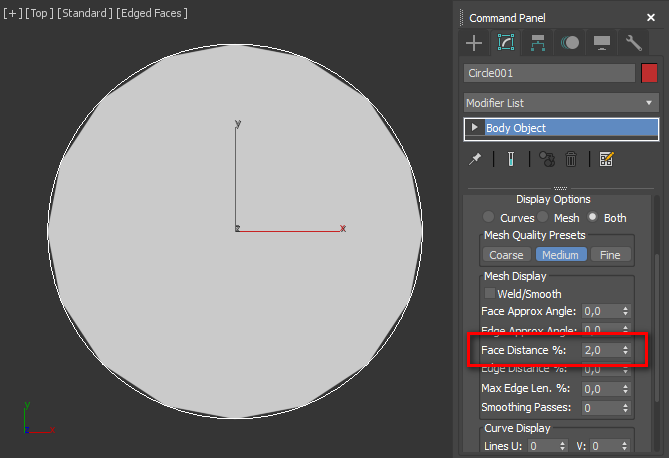
 These three examples show an increasing mesh accuracy by decreasing the face distance %. This means the mesh is allowed to deviate from the perfect circle less and less.
 Going back to the torus, the face distance % gives us a nice and even curvature on both the big and small curve. You can see that the small curve has less segments.
Maximum edge length
The maximum length for any mesh edge. Adjust this setting to get a mesh without long, narrow polygons. This value is used to control the subdivision of the display mesh. The default value of 0.0 disables this setting.
This is a great way to add detail to flat surfaces. Flat surfaces aren’t influenced by the approximation angles and distance percentages.
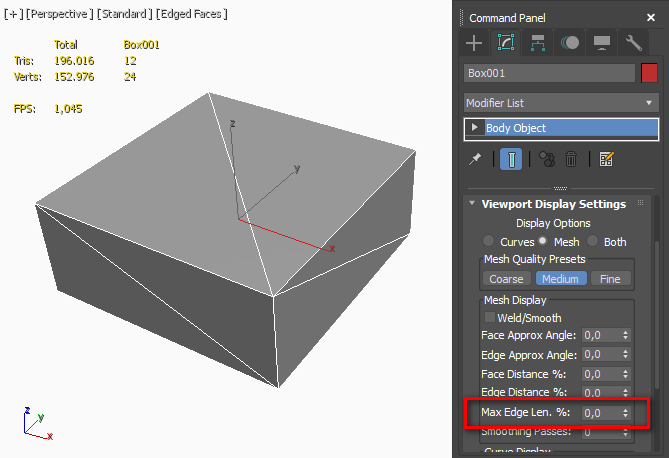
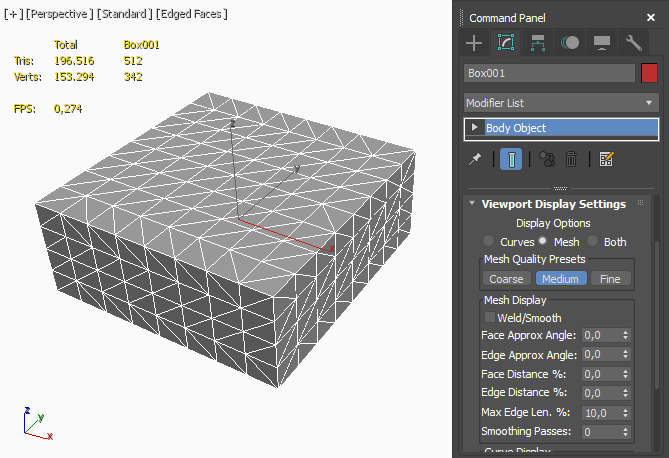
Edge approx angle and Edge distance %
I’ve not used these two often. The other three settings seem to do the trick and these edge settings haven’t added any value.


1 Comment
Join the discussion and tell us your opinion.
Thanks for these tips. I’m new to 3ds max and trying to edit the mesh parameters of a body object as you’re showing. I converted the object and have it selected but when I change the numbers in the modifier the mesh doesn’t visibly change at all. Any ideas what could be happening?
Screenshot:
https://i.imgur.com/PYoXgA2.jpg